Archive | Cooking RSS feed for this section

Product Review: Nagasaki Saru Udon

8 Feb

Hi guys!

Personal statements suck, so now I’m here writing a blog post! Yayyy!

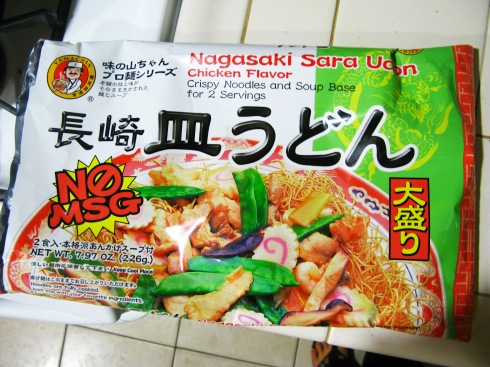
Tonight I decided to make this:

OMG doesn't it look good?

For those of you who have some ties to Hawaii, you’ll realize that it has some resemblance to a local favorite: Chinese cake noodle! For those of you who don’t know what that is, here’s a picture (from my nomshot section!):

The preparation is more labor intensive than most other instant noodle products since you actually have to add vegetables and meat to the sauce…well, I guess you DON’T have to, but it would be retarded to just eat the noodles with the gravy.

Anyways, here’s how the noodles look after taking it out of the package:

Oooh I could just snack on this!

I opted to stir fry some chicken thigh meat, carrots, onions, green onions, and Amano’s Vegetable Tempura before adding the sauce mixture.

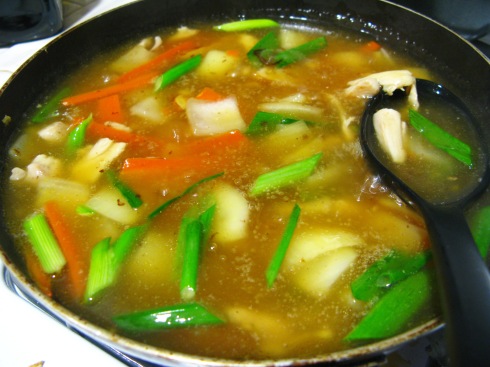
The sauce/gravy before it thickens

Notice how the liquid looks like really crappy canned chicken noodle soup? Well, that changes so do not fear! After it reaches a bubble it thickens and turns into a clear gravy!

Now it's starting to look really good!

And how does it look once once the gravy meets the noodles? Like this!

Wowzaz!

And for those of you who are wondering, no, I did not eat that all in one sitting. That’s just disgusting. This is my portion:

Delicious!

Just ignore the money in the background. I forgot to move it out of the way. Anyways, after eating my portion of the meal, I would give this a solid TWO THUMBS UP! The noodles are on the thinner side so they get soggy quite quickly, but you can easily prevent this by only pouring some of the sauce onto the noodles at once.

That’s all for now folks!

Oh, by the way! I finally got a yelp account! So for the like, two souls, that read my blog, you can friend me on yelp! I’m Chantelle “Chumbawumba” T.

Korean Braised Short Ribs (Galbijim)

8 Dec

I know I promised you all pieorgies but I just couldn’t find the time to make such a labor-intensive dish this past week with finals right around the corner. Sorry! I think that will be the first thing I make after I return home to Hawaii. (I’ll explain why I’m going to wait towards the end of this post.) But I did have time to make galbijim, which is basically a Korean version of beef bourguignon.

So much meat you can't find the bone...

First things first, the meat. I used a different cut of short ribs since I didn’t have time to go to the Korean supermarket. Notice how there’s so much meat you feel like you’re playing “Find the Rib!”?

Again, look at all that meat!

In the recipe I used they didn’t cut the meat, but I did to increase the surface area. More surface area means more opportunity for flavor infusion! Now for those of you who are getting giddy because I mentioned “surface area” you can geek out now. I did. Also, as a side note, cut the meat with an actual chef’s knife and not a steak knife. It’ll be easier than what I went through, I swear.

This is what it SHOULD look like after you pre-boil it!

Don’t skip this part! And don’t just stick the meat in the boiling water for 2 minutes. Leave it in there for 5-10 minutes! Otherwise you’ll have tons of cooked blood, fat, and other disgusting gunk floating at the top of your galbijim. No one wants to see that or eat that.

Shiitake, carrots, onions, garlic, and FLAVOR SAUCE!

Okay, it’s not flavor sauce, but it’s fun to say.
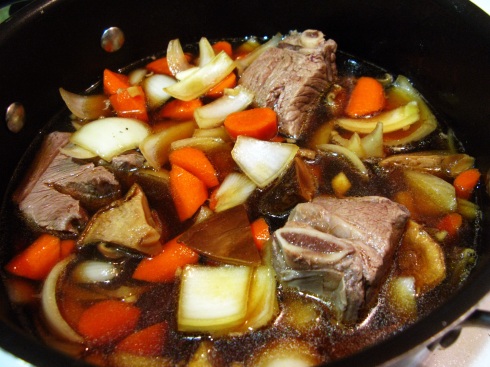
Time to start salivating…

Dump everything into the pot and set that timer!

After 2.5 hours of cooking!

Once the meat starts falling off the bone, kill the heat, and ladle some (or a lot) onto a hot bowl of rice. Now that looks like a fitting meal for these cold winter months, right?

Although the thicker cut of short ribs produced a better meat to bones ratio, it did have its shortcomings. First, it took way longer to cook; and second, it wasn’t as strongly infused with flavor as I would’ve hoped. If you choose to use this cut of ribs, I’d recommend marinating it in the sauce along with the veggies.

Galbijim

Adapted from Maangchi

Serves 2-3
Preparation Time: 20 min
Cooking Time: 2 hrs 30 min

Ingredients

2lbs beef short ribs
2 cups water
1 tbs cooking sake
4 tbs soy sauce
1 tbs brown sugar
8 cloves garlic, minced
2 tbs corn syrup (I didn’t have corn syrup on hand, so I used honey instead)
1 tbs sesame oil
½ tsp black pepper
½  medium onion, sliced
1 medium radish, 2 in cubes (I used potatoes instead)
3 carrots, 2 in cubes
1 ½ cups shiitake mushrooms, rehydrated and cubed
Green onion
Ground black pepper

Soak the shiitake mushrooms in warm water for about 4-6 hours. Soak short ribs in cold water for at least 30 minutes and change the water a few times (this is to get rid of bone chips and other debris). Boil water in a large pot. Add the short ribs. Boil for 5-10 minutes. Remove the short ribs and wash them with cold water to remove fat or floating bubbles. Clean the pot and set back onto stove. Place the clean beef short ribs in the pot.

Prepare a bowl of seasoned water by mixing the water, soy sauce, garlic, onion, carrots, shiitake mushrooms, rice wine, and brown sugar. Add it to the pot. Boil over medium heat for 20 minutes.

Simmer on low for 1 hour or as long as needed for the meat to fully cook. Use your chopstick to check the tenderness of the meat. If it goes in smoothly, then the meat is tender enough. Add the potatoes.

Once the potatoes are cooked, add the honey, sesame oil, and black pepper. Turn heat to high and mix well until liquid evaporates. Once the liquid has evaporated it’s ready to serve!

EDIT: I forgot to mention why I’m not going to post any other cooking posts until later (yes, I’m going to continue the blog)! It’s because my house is a pig stein. That’s why the pictures were carefully framed…I had literally no space to cook. Thanks housemates.

Day of nomtastic turkey is TOMORROW!

25 Nov


flickr/WishUponACupcake

That’s right folks, Thanksgiving is TOMORROW!

While most food blogs devote time to answering time-old questions–such as: What’s the best way to cook a turkey? What are the best sides to serve? What makes for the flakiest crust?—I’m not. (Don’t worry. I’ll include some links to posts that answer these questions and more.) Instead, I thought it would be nice to return the focus to WHY we do this every year.

So why do it every year? Thanksgiving dinner (or lunch for you early birds) is quite a daunting task to take on. For me, the reason is quite simple: it’s worth it because with the Thanksgiving feast come great company—whether it is friends, acquaintances, or family—and that’s what makes everything worth it in the end.

Now, although the reason is simple, it probably isn’t the first that pops to mind. (Don’t worry. It took me four years of celebrating Thanksgiving away from home to realize it.) For most of us the main draw is the food, and only the food. The turkey; the sweet and savory side dishes; the endless assortment of desserts; and of course, the leftovers are probably are the only things on our mind on Thanksgiving. But you have to remember that what make the food spectacular are the people who join you for the feast.

Growing up, we always made it a point to have the full Thanksgiving spread: turkey, gravy, stuffing, mashed potatoes, cranberry sauce, and dare I mention it, my Grandma’s AMAZING turkey soup. But after attending other Thanksgiving dinners, I realized that the food wasn’t as great as I thought it was. Comparatively, my Grandma’s turkey was a bit on the dry side; the gravy was, for lack of better words, different; and even our mashed potatoes (which I thought were THE BESTEST MASHED POTATOES EVER) definitely fell short. But despite all this, I still, without fail, sit at my desk in Los Angeles wishing that I was back at home in Hawaii eating the feast my Grandma had fastidiously prepared.

Why?

It’s because Thanksgiving dinner represents a special time for our family. Typical family dinners always have their hiccups that leave a sour note to perpetuate through the evening, but Thanksgiving is the one day when we’re immune from this. It’s also one of the few times when I can spend quality time with my Grandma in the kitchen—a rare, but greatly satisfying treat.

I’m not sure how it is for other people, but I can only imagine that upon further thought, everyone reaches a similar conclusion. Because regardless of what festivities you partake in, you will always remember the day for the memories you made with those that are special to you.

But for those of you who are still holding your breath in fear of how tomorrow will unfold, here are some links to helpful tips to make your Thanksgiving feast. Just remember to keep in mind the other, more important reason, for celebrating Thanksgiving—it’ll do more to calm your nerves than that carefully picked glass of wine.

For all the basics

Just in case you didn’t like the first link…

In case you lost that stuffing recipe…

For those who still need that glass of wine

I don’t blog surf enough

23 Nov

flickr/stu_spivack

I realized today that I really don’t blog surf as much as I used to. When I started following food blogs I would visit about 20-40 sites daily–a bit extreme, I know, but it brought a lot of joy (and much needed) inspiration into my life. Now, with undergrad drawing to a close I’ve realized that now I only visit about 5 sites every few day– if I’m lucky.

I think it’s about time I start up the old routine again: blog surf one day, cook the next day. Yes, believe it or not, that’s how it used to be. I would cook new dishes I found online almost every other day. It didn’t really help me deal with my ring of love (think love handles but more…like a donut), but it definitely kept me sane.

So here we go. First up on the list: pierogies.

Last month, Momofukufor2 featured a post on these delicious European dumplings (check it out here) and now I can’t stop thinking about pierogies.

The first time I encountered these European dumplings was two years ago. It was love at first bite. My pierogies contained a cheese, potato, and bacon filling and were pan-fried in browned butter, (more) bacon, and green onions. Delicious, right? But I’m definitely interested in trying out Momofukufor2’s version that uses a green onion oil and mashed potato mixture for the filling. If I have time to, maybe I’ll also try putting some shredded rafute in the mix as well for a bit of Okinawan fusion.

But first I need to go grocery shopping (something I haven’t done for the last two weeks). So the picture commentary on the results will have to wait until later. Check back in about two days–they should be up by then! But if you have some time to make those pierogies NOW, don’t let me stop you. Here, you can even have the recipe:

Pierogi Recipe adapted from Gourmet Magazine April 2004 as found on epicurious.com

yield: 48-50 pierogi

For dough
3 cups all-purpose flour plus additional for kneading
1 cup water
1 large egg
2 teaspoons vegetable oil
1 teaspoon salt

For potato filling
1 1/2 pound russet potatoes
6 ounces coarsely grated Cheddar or 4 tablespoons green onion oil*
1/4 teaspoon salt
1/4 teaspoon black pepper

Special equipment: a 2 1/2-inch round cookie cutter

Make dough:
Put flour in a large shallow bowl and make a well in centre. Add water, egg, oil, and salt to well and carefully beat together with a fork without incorporating flour. Continue stirring with a wooden spoon, gradually incorporating flour, until a soft dough forms. Transfer dough to a lightly floured surface and knead, dusting with flour as needed to keep dough from sticking, until smooth and elastic, about 8 minutes (dough will be very soft). Invert a bowl over dough and let stand at room temperature 1 hour.

Make filling while dough stands:
Peel potatoes and cut into 1-inch pieces. Cook potatoes in a large saucepan of boiling salted water until tender, about 8 minutes. Drain potatoes, then equally divide in two bowls. In one bowl add the cheese, salt, and pepper, in the other bowl, add the green onion oil. Mash the potatoes until smooth and mix thoroughly.
When mashed potatoes are cool enough to handle, use a small cookie scoop to scoop out the filling. Cover and keep the filling in the fridge until you are ready to fill your pierogi.

Form and cook pierogi:
Halve dough and roll out 1 half (keep remaining half under inverted bowl) on lightly floured surface with a lightly floured rolling pin into a 15-inch round (1/8 inch thick), then cut out 24 rounds with lightly floured cutter. Holding 1 round in palm of your hand, put 1 potato ball in centre of round and close your hand to fold round in half, enclosing filling. Pinch edges together to seal completely.

Bring a 6- to 8-quart pot of salted water to a boil. Add the pierogi, stirring once or twice to keep them from sticking together, and cook 5 minutes from time pierogi float to surface. Drain and pan fry in butter or oil over medium heat until crisp.